
How to Add a New Bank Account to QuickBooks Online
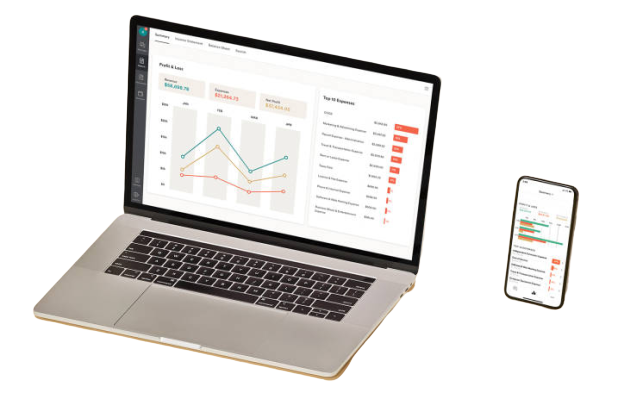
Staying on top of your business’s finances is crucial. By this point, you’ve likely moved away from manual bookkeeping and are considering cloud-based solutions like QuickBooks Online (QBO). This software provides a 360-degree view of your financial records all in one place, and you can access the data from anywhere at any time.
QuickBooks Online is an easy and secure option for your business that allows you to manage all incoming and outgoing transactions accurately. To enjoy all the benefits, you must connect your bank and credit card accounts to your QBO account. Let’s explore how to connect a bank account to QuickBooks online.
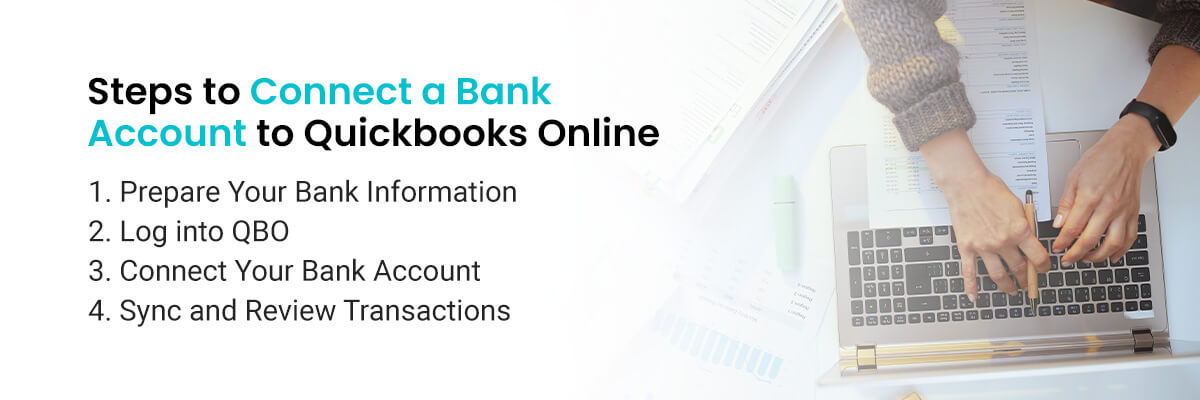
Steps to Connect a Bank Account to QuickBooks Online
Adding a bank account to QuickBooks online is fast and straightforward. These steps will ensure you set up your account correctly.
1. Prepare Your Bank Information
To make things fast and easy, you can prepare this information before logging in to QBO:
- Bank name: Write down the name of the bank you’re linking to, such as Bank of America. If you have multiple bank accounts, confirm that you have the right account for the right bank.
- Login credentials: Write down your login credentials for your bank to save time.
- Account numbers: Compile your account number and your routing number. If you’re connecting multiple accounts, prepare a list and match the account numbers to their respective banks.
2. Log Into QBO
QuickBooks has many products, so if you visit their main website, it might be challenging to find the QBO login page. Instead, search “QuickBooks Online login” in your browser, or click here. From there, click on “QuickBooks Online” to log in. You can ignore similar products with a longer name, such as “QuickBooks Online Accountant” or “QuickBooks Online Advanced.”
3. Connect Your Bank Account
Once you’re in, you can add a bank account to QuickBooks Online. Hover over the “Transaction” tab on the left side of your screen under “Dashboard” and click “Banking.” Next, click the green “Connect Account” button.
Select your bank from the list of popular options, or use the search feature to find and select your bank. The next screen will ask you to enter your bank account login details. QBO will ask you to verify it’s you via phone call, text or email. If you have multiple accounts under the same financial institution, you can pick which ones you want QBO to link to and pull into your feed. You do not have to select every account you see.
Next, you’ll choose how far back you want QBO to go when downloading your transactions. The default option is the beginning of the previous year, but you can choose any date. Finally, click “Connect.”
4. Sync and Review Transactions
Once you’ve linked your accounts, the transaction page will populate with up-to-date information from the date you entered to the current date. New transactions will appear on this list as they occur. To return to the transactions page after navigating away, select “Bookkeeping” and then “Transactions.”
Now, you can categorize or uncategorize transactions as you see fit. Make sure you’re looking at the right account! You can click between accounts at the top of the “Transactions” page.
Next to each transaction, you’ll see a green button labeled “Confirm” and a white button labeled “Review.” The “Confirm” button means QBO is suggesting a category for the transaction. The “Review” button means you’ll need to assign the transaction a category yourself. Here’s how:
- Click “Confirm” or “Review.”
- Adjust any of QuickBooks’ suggested information or fill out empty boxes.
- Click “Confirm.”
Over time, QuickBooks will learn your category preferences and make everything much easier.
You can also select the “Split Transaction” option above the “Category” box. This will open a pop-up screen where you can add multiple categories and the payment amount for each. Double-check that it adds up to the total amount!
You may also see “Record Found” under the “Assign To” column. This means QuickBooks has detected that a transaction relates to something you’ve already recorded in QBO and helps prevent duplicates. You can select “Confirm” if the transaction matches your bank statement. If it does not match, you can categorize the transaction using the same steps found above. You can also select “Find Other Matches” if you’ve added the transaction to QuickBooks but notice that the match is still wrong.
Issues When Adding Bank Accounts to Quickbooks Online
It’s normal to hit some speed bumps when using online platforms, and QuickBooks Online is no exception. However, these minor inconveniences are easy to resolve when you know what to do! Here’s an overview of some common issues you may face and how to navigate them.
Error Codes
An “Error 101” message when trying to link your bank account may indicate that the account is inactive or that you have not accepted the bank’s terms and conditions.
Here are some ways you can fix this error:
- Try to log in to your bank using a different browser or tab.
- Confirm that your account is still active. Active accounts have an existing balance or have made transactions in the last 12 months. If you’re having issues with an account that’s supposed to be active, reach out to your bank.
- Confirm you’ve accepted your bank’s terms and conditions or other prompts.
- Log in to QBO using a private browser.
Manual Transaction-Related Errors
Connecting your bank account means QBO will automatically upload your transactions. However, if you choose to upload transactions manually, you may sometimes receive an error message. These indicate that the QBO system does not accept that specific action and something needs fixing. For example, an error message might say the file contains invalid transaction amount information if the transaction has 12 or more digits. Luckily, these manual transaction issues are usually simple to fix.
To fix error codes or messages, check out this QuickBooks help page, which contains information specific to these types of errors. You can also reach out to your bookkeeping service.

Learn to Add a New Bank Account to QBO With Steph’s Bookkeeping Service
Anyone can learn to add a new bank account to QBO and do it like a pro. With this tutorial for linking an account, you can complete the task in minutes! If you prefer step-by-step reading, come back to this guide whenever you’re ready.
If you’re unable to connect your bank account to QuickBooks Online or have additional questions, you’re in the right place. As a leading Quickbooks Certified ProAdvisor bookkeeper, Steph’s Bookkeeping Service can help you set up your QBO account and get used to the platform.
Explore our QuickBooks Online Training services, or reach out to us online to let us know how we can support your business!